3-Tier Deployment Guide
Production deployment instructions for the 3-Tier Multi-VM Orchestration Engine Cluster.
MCM Platform — 3-Tier Deployment Guide
About this architecture
The 3-tier orchestrated deployment is the recommended architecture for production environments. It separates services by role into three distinct tiers to meet strict security compliance standards (such as SOC 2 and HIPAA) and optimize system performance:
- Tier 1: Access Node (VM1): Hosts the gateway interface. This is the only node exposed to public traffic.
- Tier 2: App Node (VM2): Hosts the core backend microservices and the User Interface (UI).
- Tier 3: DB Node (VM3): Hosts the storage layers.
3-Tier Network Architecture
1. Prerequisites & VM Specifications
Ensure that your physical, virtual (on-premises), or cloud virtual machines meet the following minimum configuration requirements:
| Host / VM | Role / Tier | OS | CPU | RAM | Disk | Network | Cloud VM Examples (AWS / Azure / GCP) |
|---|---|---|---|---|---|---|---|
VM 1 (mcm-access) | Access Gateway / Manager | Ubuntu 22.04 LTS | 2 CPU | 4 GB | 35 GB SSD | 1 Gbps | t2.medium / Standard_D2als_v5 / e2-medium |
VM 2 (mcm-app) | Backend APIs & UI | Ubuntu 22.04 LTS | 4 CPU | 16 GB | 50 GB SSD | 1 Gbps | t2.xlarge / Standard_D4ads_v5 / e2-standard-4 |
VM 3 (mcm-db) | Database | Ubuntu 22.04 LTS | 4 CPU | 16 GB | 105 GB SSD | 1 Gbps | t2.xlarge / Standard_D4ads_v5 / e2-standard-4 |
Scaling for Production
The above specifications are the minimum requirements to deploy and run the MCM Platform. For production environments with larger workloads, refer to the VM Sizing Guide for recommended specifications based on your managed resource count.
Network Isolation & Public IP Requirements (Recommended)
To secure the platform from external vectors:
- VM1 (Access Node) - Public IP Required: VM1 must have a public IP address so you can access the ingress gateway and SSH into it from outside the network.
- VM2 & VM3 (App & DB Nodes) - Complete Public Isolation: Both the App Node (VM2) and DB Node (VM3) must be placed in private subnets/VLANs. They do not have public IP addresses (only private IPs) and cannot be reached directly from the internet.
- Outbound Internet Access (VM2): The containers running on the App Node (VM2) require outbound internet access (e.g., via a NAT Gateway or proxy). This is because the MCM microservices must connect to public cloud provider endpoints/APIs (such as AWS, GCP, and Azure APIs) to orchestrate resources, sync inventories, and collect cost/billing metrics.
- Temporary Outbound Access (VM3): The DB Node (VM3) only needs outbound internet access (e.g., via a NAT Gateway or proxy) temporarily during installation/upgrades to fetch packages, after which it can be restricted to internal cluster communications.
For simpler network topologies, VM1 and VM2 can share the same public subnet. In this configuration, VM2 should have outbound internet connectivity for updates and cloud APIs.
2. Network & Connectivity Requirements
To ensure strict network isolation (in accordance with the Network Isolation & Public IP Requirements detailed in Section 1 above), VMs must be placed within a dedicated virtual network utilizing public/private subnet routing.
Configure three distinct subnets in your virtual network (e.g., range 10.0.0.0/16):
- Public Subnet (
10.0.1.0/24) — Hosts VM1 (mcm-access). - Private Subnet 1 (
10.0.2.0/24) — Hosts VM2 (mcm-app). - Private Subnet 2 (
10.0.3.0/24) — Hosts VM3 (mcm-db).
The cloud network templates, security groups, NSGs, and UFW command snippets throughout this guide are configured using these example CIDR ranges. If your deployment uses a different IP layout, ensure you adapt all subnet ranges, IP values, and source filters accordingly.
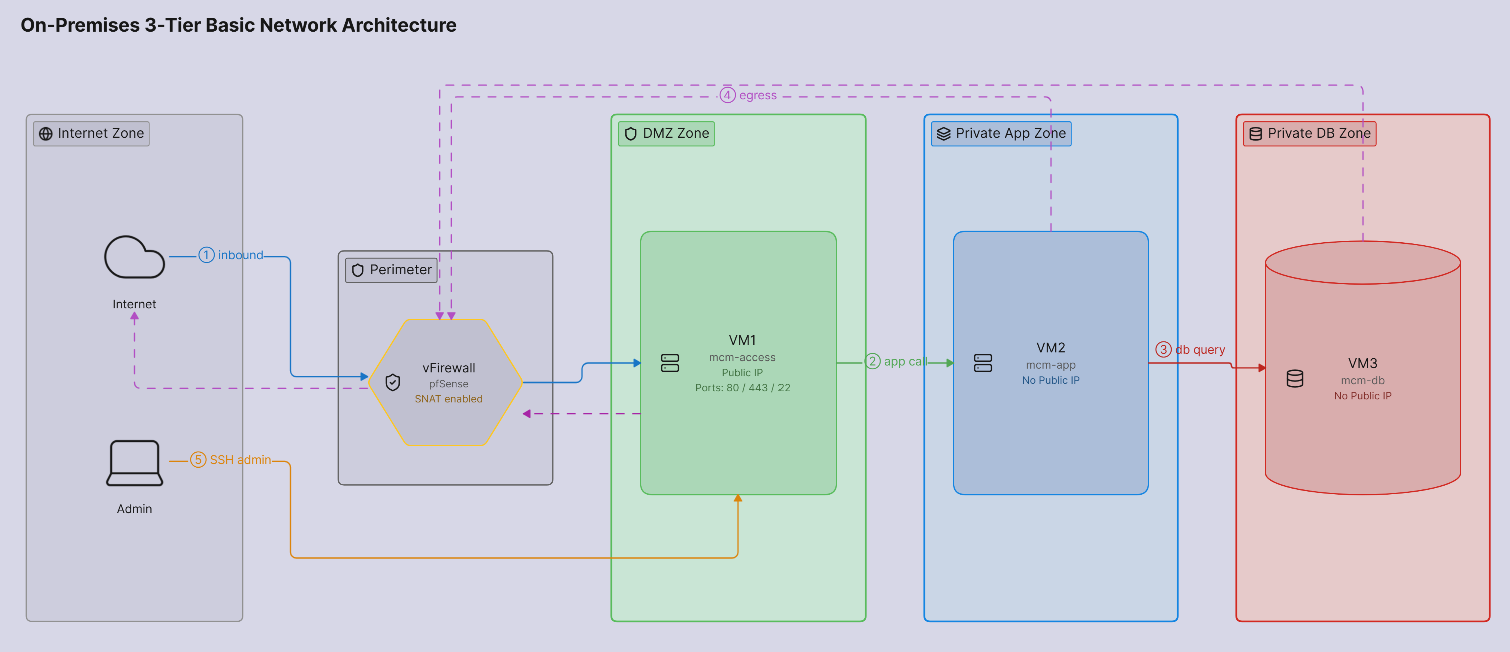
Procedure: On-Premises & Private Cloud Setup
- Configure Network Topology: Configure virtual switches (vSwitches), routing, and firewalls to meet these conditions:
- Access Node (VM1): Must have a public IP address (or static public NAT mapping) to reach the internet and accept inbound connections on Port 80 (HTTP) and Port 443 (HTTPS). It must also have a private IP that can route traffic to VM2 and VM3.
- App Node (VM2) & DB Node (VM3): Kept inside a private, isolated network. No direct inbound access from the internet is permitted.
- Outbound NAT Routing: Configure your virtual firewall/router (e.g., pfSense, Cisco, OPNsense) to perform Source NAT (SNAT) / IP Masquerading so VM2 and VM3 can connect outbound to the internet.
- SSH Inter-node Reachability: Ensure VM1 can connect directly to VM2 and VM3 on Port 22 (SSH).
- Automated SSH Key Generation: The installer script
install.shrunning on VM1 (Access Node) automatically manages key distribution:- Key Generation: If no key exists, it will automatically generate a secure 4096-bit RSA keypair at
/home/[user]/3-tier.pemon VM1. - Public Key Distribution: The script will prompt you for the SSH passwords of VM2 and VM3, using
sshpassto transfer the public key. - Passwordless Sudo Configuration: It will also configure passwordless sudo privileges for the SSH users on VM2 and VM3.
- Key Generation: If no key exists, it will automatically generate a secure 4096-bit RSA keypair at
3-Tier On-Premises Network Topology Diagram
Procedure: AWS VPC & Networking Setup
-
Create the VPC:
- Navigate to the VPC Dashboard in the AWS Console and select Create VPC.
- Choose VPC only. Name it
mcm-vpcand set the IPv4 CIDR block to10.0.0.0/16.
-
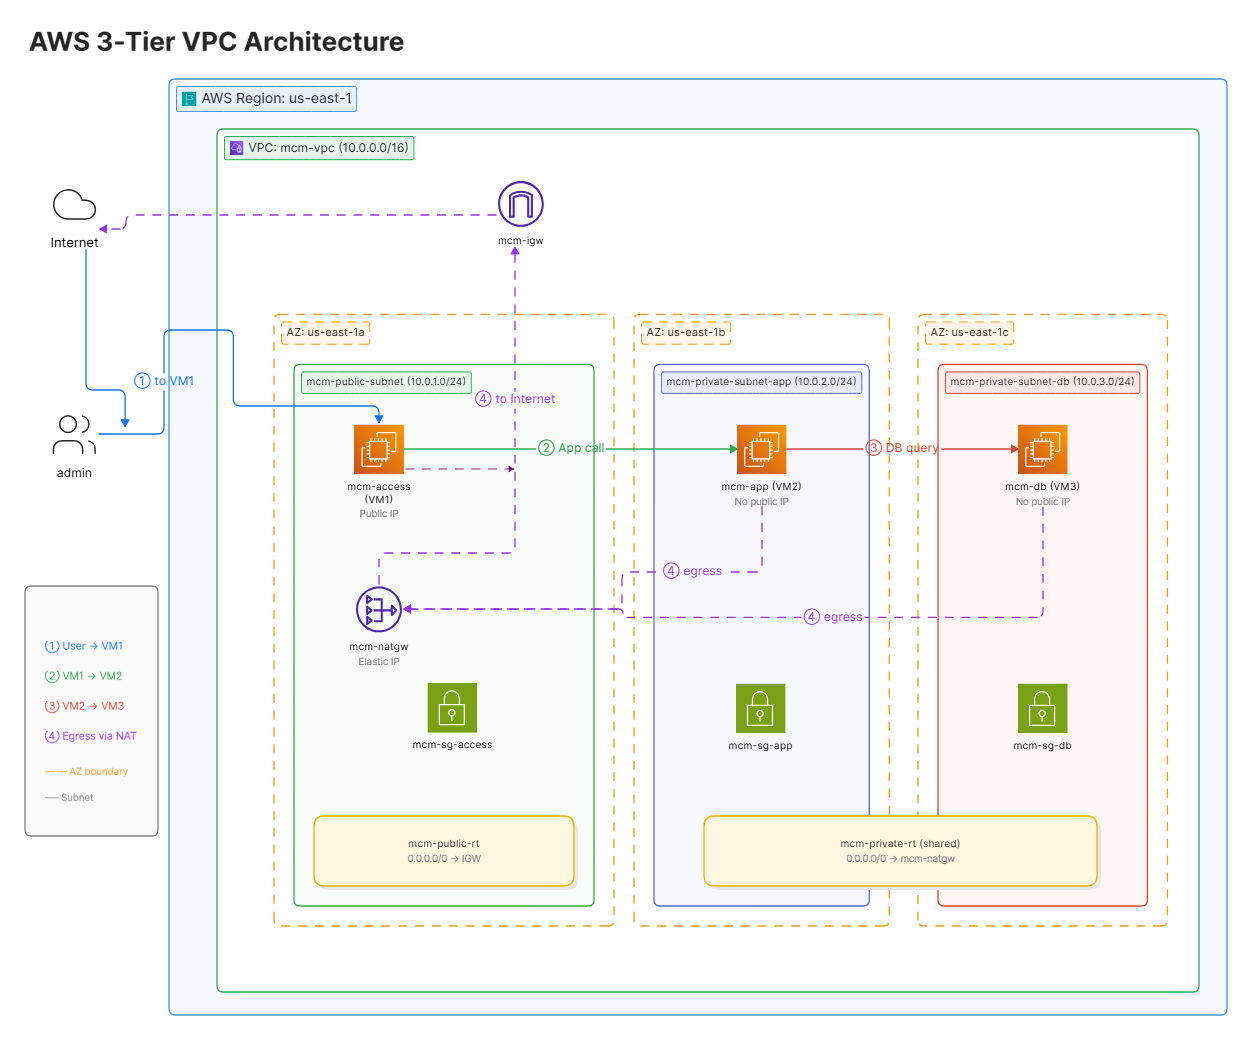
Create Subnets: Create three subnets inside
mcm-vpc. To ensure physical fault tolerance, place them in different Availability Zones (AZs):mcm-public-subnet: CIDR10.0.1.0/24, Availability Zoneus-east-1a(Access Gateway Node).mcm-private-subnet-app: CIDR10.0.2.0/24, Availability Zoneus-east-1b(App Node).mcm-private-subnet-db: CIDR10.0.3.0/24, Availability Zoneus-east-1c(Database Node).
-
Enable Auto-Assign Public IP on Public Subnet:
- Select
mcm-public-subnetfrom the Subnets list. - Click Actions > Edit subnet settings.
- Under the Auto-assign IP settings, check Enable auto-assign public IPv4 address. Save changes.
- Select
-
Create Internet Gateway (IGW):
- Select Internet Gateways in the left menu, and click Create internet gateway. Name it
mcm-igw. - Once created, select
mcm-igw, click Actions > Attach to VPC, choosemcm-vpc, and attach it.
- Select Internet Gateways in the left menu, and click Create internet gateway. Name it
-
Configure Public Routing:
- Select Route Tables in the left menu and click Create route table. Name it
mcm-public-rtand link it tomcm-vpc. - Edit the routes for
mcm-public-rt: Add a route with Destination0.0.0.0/0and TargetInternet Gateway > mcm-igw. - Go to Subnet associations > Edit subnet associations and associate it with
mcm-public-subnet.
- Select Route Tables in the left menu and click Create route table. Name it
-
Configure NAT Gateway:
- Select NAT Gateways in the left menu and click Create NAT gateway.
- Name it
mcm-natgw. Selectmcm-public-subnetas the subnet. - Under Elastic IP allocation ID, click Allocate Elastic IP to assign a static public EIP. Click Create NAT gateway.
-
Configure Private Routing:
- Create another route table named
mcm-private-rtand link it tomcm-vpc. - Edit the routes for
mcm-private-rt: Add a route with Destination0.0.0.0/0and TargetNAT Gateway > mcm-natgw. - Go to Subnet associations > Edit subnet associations and associate it with
mcm-private-subnet-appandmcm-private-subnet-db.
- Create another route table named
-
Instance Deployment:
- Launch VM1 (
mcm-access) inmcm-public-subnet. Choose a standard Ubuntu Server 22.04 LTS AMI. Verify that a public IPv4 address is auto-assigned, and associate it with themcm-sg-accessSecurity Group (detailed in Section 3). - Launch VM2 (
mcm-app) inmcm-private-subnet-appand VM3 (mcm-db) inmcm-private-subnet-dbusing the same Ubuntu 22.04 AMI. Ensure Auto-assign public IP is set to Disable for both to maintain private network isolation, and associate them with themcm-sg-appandmcm-sg-dbSecurity Groups respectively (detailed in Section 3).
- Launch VM1 (
3-Tier AWS Network Topology Diagram
Procedure: Azure Virtual Network Setup
-
Create the Virtual Network (VNet):
- Navigate to the Azure Portal and search for Virtual Networks. Click Create.
- Name the VNet
mcm-vnet. Define the primary address space as10.0.0.0/16.
-
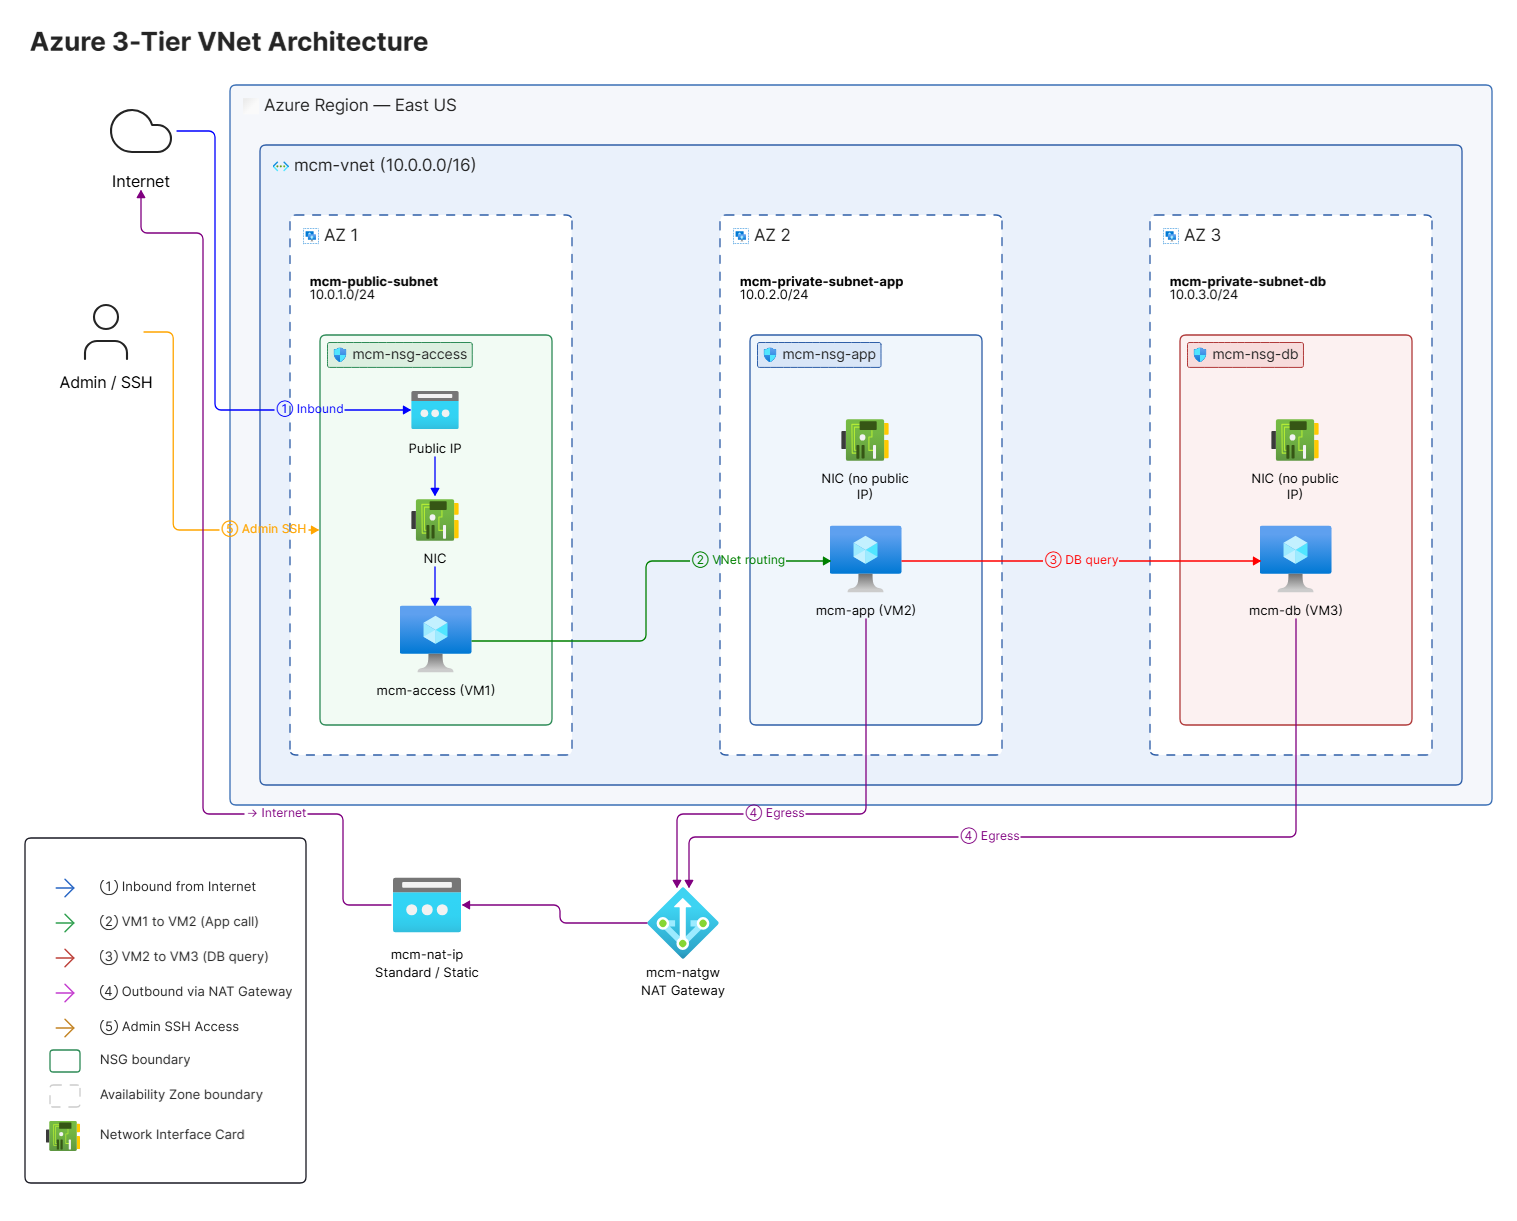
Create Subnets: Add three subnets inside
mcm-vnet:mcm-public-subnet: CIDR10.0.1.0/24(Access Gateway Node).mcm-private-subnet-app: CIDR10.0.2.0/24(App Node).mcm-private-subnet-db: CIDR10.0.3.0/24(Database Node).
-
Create Public IP for NAT:
- Search for Public IP addresses in the portal and click Create.
- Select Standard SKU, Static allocation, and name it
mcm-nat-ip. Choose the same resource group and region as your VNet.
-
Create the NAT Gateway:
- Search for NAT Gateways in the portal and click Create. Name it
mcm-natgw. - Under the Outbound IP tab, select the previously created standard public IP resource
mcm-nat-ip.
- Search for NAT Gateways in the portal and click Create. Name it
-
Associate Private Subnets with NAT Gateway:
- On the NAT Gateway configuration page, go to the Subnet tab.
- Select
mcm-vnetand associate the gateway withmcm-private-subnet-appandmcm-private-subnet-db. Click Create.
-
Instance Deployment:
- Deploy VM1 (
mcm-access) inmcm-public-subnet. Associate a Standard Public IP address with its Network Interface (NIC), and link its subnet or NIC with themcm-nsg-accessNetwork Security Group (NSG) detailed in Section 3. Select Availability Zone 1 for VM placement. - Deploy VM2 (
mcm-app) inmcm-private-subnet-app(Availability Zone 2, linked with themcm-nsg-appNSG detailed in Section 3) and VM3 (mcm-db) inmcm-private-subnet-db(Availability Zone 3, linked with themcm-nsg-dbNSG detailed in Section 3). Do not associate public IPs with their NICs (set public IP to None).
- Deploy VM1 (
3-Tier Azure Network Topology Diagram
Procedure: GCP VPC Setup
-
Create the VPC Network: Create a custom VPC network utilizing custom subnets:
gcloud compute networks create mcm-vpc --subnet-mode=custom -
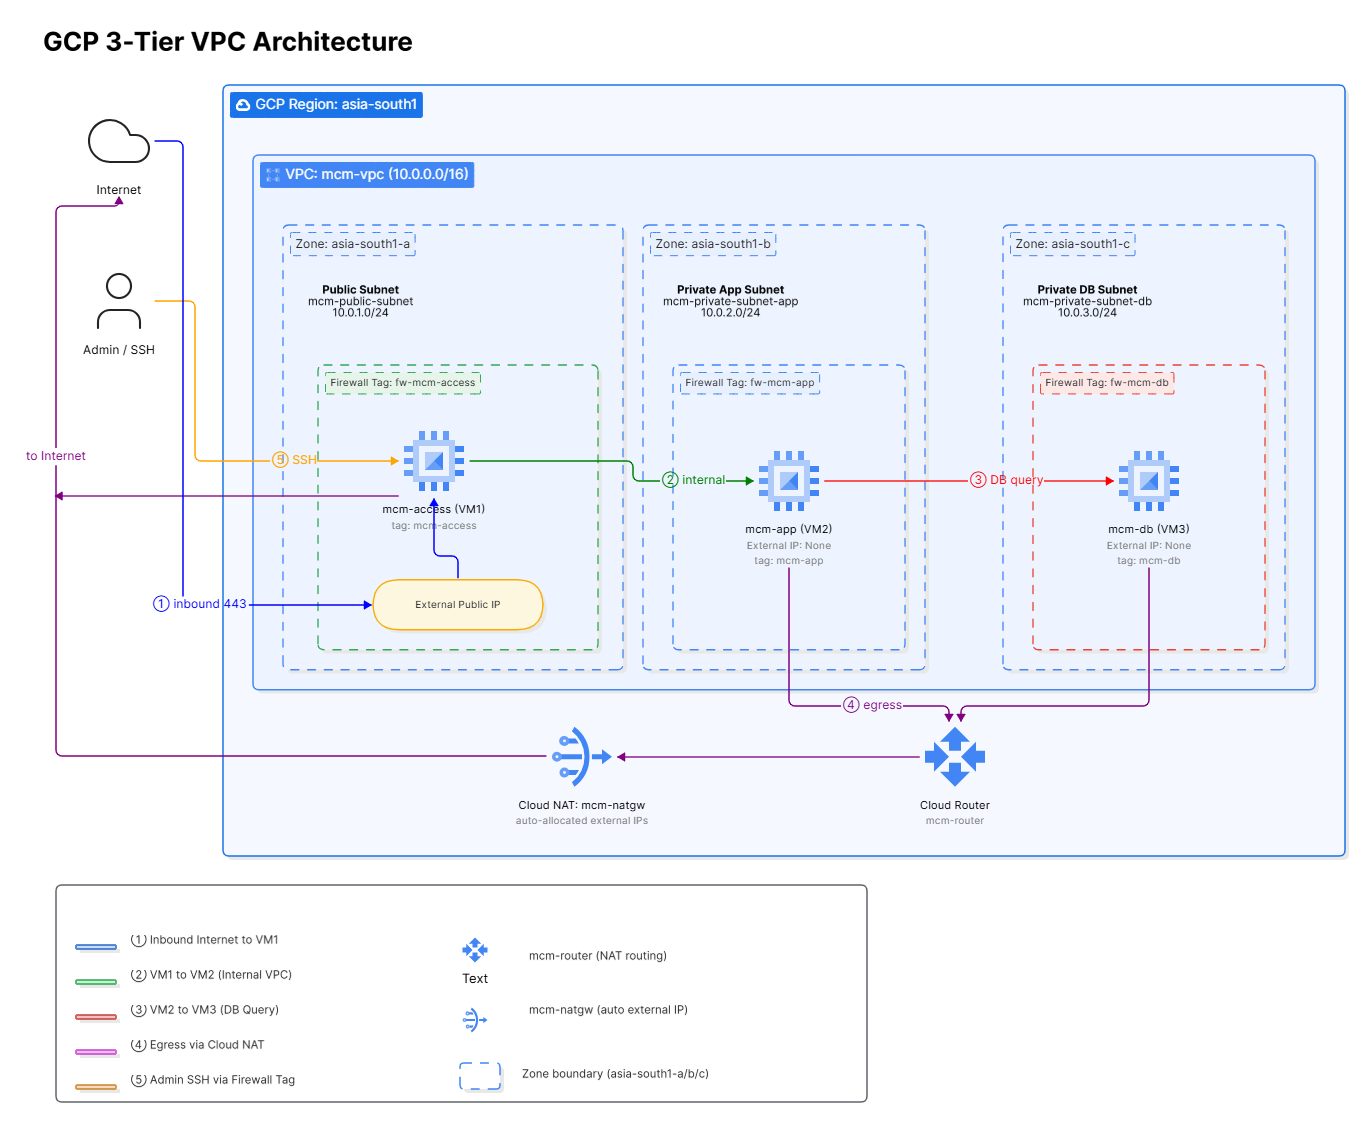
Create Subnets: Create three distinct subnets. Place them in your target region (e.g.,
asia-south1):gcloud compute networks subnets create mcm-public-subnet --network=mcm-vpc --range=10.0.1.0/24 --region=asia-south1 gcloud compute networks subnets create mcm-private-subnet-app --network=mcm-vpc --range=10.0.2.0/24 --region=asia-south1 gcloud compute networks subnets create mcm-private-subnet-db --network=mcm-vpc --range=10.0.3.0/24 --region=asia-south1 -
Configure Cloud Router: Create a Cloud Router inside the same region to manage the NAT routing tables:
gcloud compute routers create mcm-router --network=mcm-vpc --region=asia-south1 -
Configure Cloud NAT Gateway: Create a Cloud NAT gateway to enable private nodes to download dependencies safely:
gcloud compute routers nats create mcm-natgw \ --router=mcm-router \ --region=asia-south1 \ --auto-allocate-nat-external-ips \ --nat-custom-subnet-ip-ranges=mcm-private-subnet-app,mcm-private-subnet-db -
Instance Deployment:
- Launch VM1 (
mcm-access) inmcm-public-subnet(placed in Zoneasia-south1-a) and assign an external ephemeral or static public IP. Assign the network tagmcm-accessto VM1 to apply the target firewall rules detailed in Section 3. - Launch VM2 (
mcm-app) inmcm-private-subnet-app(Zoneasia-south1-b, tagmcm-app) and VM3 (mcm-db) inmcm-private-subnet-db(Zoneasia-south1-c, tagmcm-db). Ensure External IP is set toNonefor both to apply the target firewall rules detailed in Section 3.
- Launch VM1 (
3-Tier GCP Network Topology Diagram
3. Firewall / Security Rules
Security Rule Rationale
- Port 22 (TCP): Used for administrative SSH access to VM1, and for the deployment script on VM1 to securely tunnel configurations, keys, and certificates to VM2 and VM3.
- Port 80 (TCP): Used for standard HTTP traffic. Port 80 automatically redirects incoming requests to secure HTTPS (port 443) so users do not experience connection errors if they access the site via
http://. - Port 443 (TCP): Used for the primary secure application gateway access (routed through VM1).
- Port 2377 (TCP): Used for cluster management communications. This is only needed between the Manager (VM1) and Workers (VM2, VM3).
- Port 7946 (TCP & UDP): Used for control-plane "gossip" communication to exchange membership lists and discover services.
- Port 4789 (UDP): Used for the VXLAN overlay data plane. This encapsulates container-to-container packets securely over a flat virtual network.
Procedure: On-Premises Host-Level Firewall Setup (UFW Commands)
Run the following commands on the respective VMs to apply the firewall configuration:
1. On VM1 (Access Node)
Configure the node IPs at the top and execute the rules:
# Define node IPs
ACCESS_NODE_IP="[YOUR_ACCESS_NODE_PRIVATE_IP]"
APP_NODE_IP="[YOUR_APP_NODE_PRIVATE_IP]"
DB_NODE_IP="[YOUR_DB_NODE_PRIVATE_IP]"

sudo ufw default deny incoming
sudo ufw default allow outgoing
sudo ufw allow 80/tcp comment "HTTP APISIX Redirect"
sudo ufw allow 443/tcp comment "HTTPS APISIX Gateway"
sudo ufw allow from "$ACCESS_NODE_IP" to any port 22 proto tcp comment "Access Node SSH"

# Container Orchestrator & Gossip ports
sudo ufw allow from "$APP_NODE_IP" to any port 2377 proto tcp comment "Orchestrator Manager"
sudo ufw allow from "$APP_NODE_IP" to any port 7946 proto tcp comment "Gossip Control TCP"
sudo ufw allow from "$APP_NODE_IP" to any port 7946 proto udp comment "Gossip Control UDP"
sudo ufw allow from "$APP_NODE_IP" to any port 4789 proto udp comment "VXLAN Orchestrator Overlay"

sudo ufw allow from "$DB_NODE_IP" to any port 2377 proto tcp comment "Orchestrator Manager"
sudo ufw allow from "$DB_NODE_IP" to any port 7946 proto tcp comment "Gossip Control TCP"
sudo ufw allow from "$DB_NODE_IP" to any port 7946 proto udp comment "Gossip Control UDP"
sudo ufw allow from "$DB_NODE_IP" to any port 4789 proto udp comment "VXLAN Orchestrator Overlay"

sudo ufw --force enable
2. On VM2 (App Node)
Configure the node IPs at the top and execute the rules:
# Define node IPs
ACCESS_NODE_IP="[YOUR_ACCESS_NODE_PRIVATE_IP]"
DB_NODE_IP="[YOUR_DB_NODE_PRIVATE_IP]"

sudo ufw default deny incoming
sudo ufw default allow outgoing
sudo ufw allow from "$ACCESS_NODE_IP" to any port 22 proto tcp comment "SSH from VM1"

# Container Orchestrator & Gossip ports
sudo ufw allow from "$ACCESS_NODE_IP" to any port 7946 proto tcp comment "Gossip Control TCP"
sudo ufw allow from "$ACCESS_NODE_IP" to any port 7946 proto udp comment "Gossip Control UDP"
sudo ufw allow from "$ACCESS_NODE_IP" to any port 4789 proto udp comment "VXLAN Orchestrator Overlay"

sudo ufw allow from "$DB_NODE_IP" to any port 7946 proto tcp comment "Gossip Control TCP"
sudo ufw allow from "$DB_NODE_IP" to any port 7946 proto udp comment "Gossip Control UDP"
sudo ufw allow from "$DB_NODE_IP" to any port 4789 proto udp comment "VXLAN Orchestrator Overlay"

sudo ufw --force enable
3. On VM3 (DB Node)
Configure the node IPs at the top and execute the rules:
# Define node IPs
ACCESS_NODE_IP="[YOUR_ACCESS_NODE_PRIVATE_IP]"
APP_NODE_IP="[YOUR_APP_NODE_PRIVATE_IP]"

sudo ufw default deny incoming
sudo ufw default allow outgoing
sudo ufw allow from "$ACCESS_NODE_IP" to any port 22 proto tcp comment "SSH from VM1"

# Container Orchestrator & Gossip ports
sudo ufw allow from "$ACCESS_NODE_IP" to any port 7946 proto tcp comment "Gossip Control TCP"
sudo ufw allow from "$ACCESS_NODE_IP" to any port 7946 proto udp comment "Gossip Control UDP"
sudo ufw allow from "$ACCESS_NODE_IP" to any port 4789 proto udp comment "VXLAN Orchestrator Overlay"

sudo ufw allow from "$APP_NODE_IP" to any port 7946 proto tcp comment "Gossip Control TCP"
sudo ufw allow from "$APP_NODE_IP" to any port 7946 proto udp comment "Gossip Control UDP"
sudo ufw allow from "$APP_NODE_IP" to any port 4789 proto udp comment "VXLAN Orchestrator Overlay"

sudo ufw --force enable
Procedure: AWS Security Group Setup
Configure the following Security Group rules on AWS for mcm-sg-access, mcm-sg-app, and mcm-sg-db:
1. Ingress Subnet Security Group (mcm-sg-access) Rules
| Direction | Protocol | Port Range | Source / Destination | Description |
|---|---|---|---|---|
| Inbound | TCP | 80 | 0.0.0.0/0 | Gateway HTTP Port (redirects to HTTPS) |
| Inbound | TCP | 443 | 0.0.0.0/0 | Primary Gateway HTTPS Endpoint |
| Inbound | TCP | 22 | Admin IP | Secure Shell Access |
| Inbound | TCP | 2377 | mcm-sg-app | Container Orchestrator Cluster Management Port |
| Inbound | TCP | 2377 | mcm-sg-db | Container Orchestrator Cluster Management Port |
| Inbound | TCP | 7946 | mcm-sg-app | Container Orchestrator Gossip Protocol Control Plane (TCP) |
| Inbound | TCP | 7946 | mcm-sg-db | Container Orchestrator Gossip Protocol Control Plane (TCP) |
| Inbound | UDP | 7946 | mcm-sg-app | Container Orchestrator Gossip Protocol Control Plane (UDP) |
| Inbound | UDP | 7946 | mcm-sg-db | Container Orchestrator Gossip Protocol Control Plane (UDP) |
| Inbound | UDP | 4789 | mcm-sg-app | VXLAN Data Plane (Container Orchestrator Overlay) |
| Inbound | UDP | 4789 | mcm-sg-db | VXLAN Data Plane (Container Orchestrator Overlay) |
2. App Subnet Security Group (mcm-sg-app) Rules
| Direction | Protocol | Port Range | Source / Destination | Description |
|---|---|---|---|---|
| Inbound | TCP | 22 | mcm-sg-access | VM1 SSH Tunnel access for installer |
| Inbound | TCP | 7946 | mcm-sg-access | Container Orchestrator Gossip Protocol Control Plane (TCP) |
| Inbound | TCP | 7946 | mcm-sg-db | Container Orchestrator Gossip Protocol Control Plane (TCP) |
| Inbound | UDP | 7946 | mcm-sg-access | Container Orchestrator Gossip Protocol Control Plane (UDP) |
| Inbound | UDP | 7946 | mcm-sg-db | Container Orchestrator Gossip Protocol Control Plane (UDP) |
| Inbound | UDP | 4789 | mcm-sg-access | VXLAN Data Plane (Container Orchestrator Overlay) |
| Inbound | UDP | 4789 | mcm-sg-db | VXLAN Data Plane (Container Orchestrator Overlay) |
3. Database Subnet Security Group (mcm-sg-db) Rules
| Direction | Protocol | Port Range | Source / Destination | Description |
|---|---|---|---|---|
| Inbound | TCP | 22 | mcm-sg-access | VM1 SSH Tunnel access for installer |
| Inbound | TCP | 7946 | mcm-sg-access | Container Orchestrator Gossip Protocol Control Plane (TCP) |
| Inbound | TCP | 7946 | mcm-sg-app | Container Orchestrator Gossip Protocol Control Plane (TCP) |
| Inbound | UDP | 7946 | mcm-sg-access | Container Orchestrator Gossip Protocol Control Plane (UDP) |
| Inbound | UDP | 7946 | mcm-sg-app | Container Orchestrator Gossip Protocol Control Plane (UDP) |
| Inbound | UDP | 4789 | mcm-sg-access | VXLAN Data Plane (Container Orchestrator Overlay) |
| Inbound | UDP | 4789 | mcm-sg-app | VXLAN Data Plane (Container Orchestrator Overlay) |
Procedure: Azure NSG Rules Setup
Configure inbound security rules on Azure NSGs.
(Note: VNet Rule Optimization — If VM1, VM2, and VM3 are deployed within the same Azure VNet, the default Azure security rule AllowVnetInBound automatically permits all internal traffic between the subnets. In this case, you only need to configure public access rules (Ports 80, 443 from Internet, and Port 22 from your Admin IP) on the Access NSG (mcm-nsg-access)).
1. Access Subnet NSG (mcm-nsg-access) Rules:
| Priority | Direction | Protocol | Destination Port | Source Address | Destination Address | Action | Description |
|---|---|---|---|---|---|---|---|
100 | Inbound | TCP | 80, 443 | Internet | Any | Allow | Public Ingress Gateway |
110 | Inbound | TCP | 22 | Admin IP | Any | Allow | Admin SSH Access |
120 | Inbound | TCP | 2377 | 10.0.2.0/24 | Any | Allow | Container Orchestrator Management (App Node) |
121 | Inbound | TCP | 2377 | 10.0.3.0/24 | Any | Allow | Container Orchestrator Management (DB Node) |
130 | Inbound | TCP | 7946 | 10.0.2.0/24 | Any | Allow | Container Orchestrator Gossip Control (TCP - App Node) |
131 | Inbound | TCP | 7946 | 10.0.3.0/24 | Any | Allow | Container Orchestrator Gossip Control (TCP - DB Node) |
135 | Inbound | UDP | 7946 | 10.0.2.0/24 | Any | Allow | Container Orchestrator Gossip Control (UDP - App Node) |
136 | Inbound | UDP | 7946 | 10.0.3.0/24 | Any | Allow | Container Orchestrator Gossip Control (UDP - DB Node) |
140 | Inbound | UDP | 4789 | 10.0.2.0/24 | Any | Allow | Container Orchestrator VXLAN Overlay Tunnel (App Node) |
141 | Inbound | UDP | 4789 | 10.0.3.0/24 | Any | Allow | Container Orchestrator VXLAN Overlay Tunnel (DB Node) |
2. App Subnet NSG (mcm-nsg-app) Rules:
| Priority | Direction | Protocol | Destination Port | Source Address | Destination Address | Action | Description |
|---|---|---|---|---|---|---|---|
100 | Inbound | TCP | 22 | 10.0.1.0/24 | Any | Allow | SSH Tunneling from VM1 |
110 | Inbound | TCP | 7946 | 10.0.1.0/24 | Any | Allow | Container Orchestrator Gossip Control (TCP - Access Node) |
111 | Inbound | TCP | 7946 | 10.0.3.0/24 | Any | Allow | Container Orchestrator Gossip Control (TCP - DB Node) |
115 | Inbound | UDP | 7946 | 10.0.1.0/24 | Any | Allow | Container Orchestrator Gossip Control (UDP - Access Node) |
116 | Inbound | UDP | 7946 | 10.0.3.0/24 | Any | Allow | Container Orchestrator Gossip Control (UDP - DB Node) |
120 | Inbound | UDP | 4789 | 10.0.1.0/24 | Any | Allow | Container Orchestrator VXLAN Overlay Tunnel (Access Node) |
121 | Inbound | UDP | 4789 | 10.0.3.0/24 | Any | Allow | Container Orchestrator VXLAN Overlay Tunnel (DB Node) |
3. DB Subnet NSG (mcm-nsg-db) Rules:
| Priority | Direction | Protocol | Destination Port | Source Address | Destination Address | Action | Description |
|---|---|---|---|---|---|---|---|
100 | Inbound | TCP | 22 | 10.0.1.0/24 | Any | Allow | SSH Tunneling from VM1 |
130 | Inbound | TCP | 7946 | 10.0.1.0/24 | Any | Allow | Container Orchestrator Gossip Control (TCP - Access Node) |
131 | Inbound | TCP | 7946 | 10.0.2.0/24 | Any | Allow | Container Orchestrator Gossip Control (TCP - App Node) |
135 | Inbound | UDP | 7946 | 10.0.1.0/24 | Any | Allow | Container Orchestrator Gossip Control (UDP - Access Node) |
136 | Inbound | UDP | 7946 | 10.0.2.0/24 | Any | Allow | Container Orchestrator Gossip Control (UDP - App Node) |
140 | Inbound | UDP | 4789 | 10.0.1.0/24 | Any | Allow | Container Orchestrator VXLAN Overlay Tunnel (Access Node) |
141 | Inbound | UDP | 4789 | 10.0.2.0/24 | Any | Allow | Container Orchestrator VXLAN Overlay Tunnel (App Node) |
Procedure: GCP VPC Firewall Rules Setup
Create firewall rules using target tags to restrict routing scopes:
| Rule Name | Direction | Protocol | Port Range | Target Tags | Source Filter | Description |
|---|---|---|---|---|---|---|
mcm-allow-http-https | Ingress | TCP | 80, 443 | mcm-access | 0.0.0.0/0 | Public Web traffic |
mcm-allow-ssh-access | Ingress | TCP | 22 | mcm-access | Admin IP | Administrative SSH access to VM1 |
mcm-allow-ssh-internal | Ingress | TCP | 22 | mcm-app, mcm-db | mcm-access | Installer SSH access from VM1 |
mcm-allow-orchestrator-mgmt | Ingress | TCP | 2377 | mcm-access | mcm-app, mcm-db | Container Orchestrator Cluster Management |
mcm-allow-orchestrator-gossip-tcp | Ingress | TCP | 7946 | mcm-access, mcm-app, mcm-db | mcm-access, mcm-app, mcm-db | Gossip Control (TCP) |
mcm-allow-orchestrator-gossip-udp | Ingress | UDP | 7946 | mcm-access, mcm-app, mcm-db | mcm-access, mcm-app, mcm-db | Gossip Control (UDP) |
mcm-allow-orchestrator-overlay | Ingress | UDP | 4789 | mcm-access, mcm-app, mcm-db | mcm-access, mcm-app, mcm-db | VXLAN Container Orchestrator Overlay Network |
CAUTION: The Port 4789 Trap
The VXLAN overlay network data plane traffic MUST run over UDP Port 4789. If you mistakenly configure Port 4789 as TCP in your Cloud Security Groups, the Container Orchestrator services will start, but they will be completely isolated. You will experience 504 Gateway Timeouts because the microservices on VM2 will not be able to talk to the databases on VM3.
Outbound Connectivity & Domains
The MCM platform requires outbound access to the following domains for cloud management operations and optional integrations:
Registry Archive Download Note: The MCM platform deployment archive (
mcm_artifacts_1.1.0.tar.gz) contains all core application services and bundled Docker images. Since this archive is only downloaded and extracted directly on the Access Node (VM1), outbound internet connectivity to the registry repository is required only on VM1 during installation. VM2 and VM3 do not require access to the registry repository.
| Domain / Destination | Description |
|---|---|
AWS API endpoints (*.amazonaws.com) | AWS cloud management operations |
Azure API endpoints (management.azure.com, login.microsoftonline.com) | Azure cloud management operations |
api.frankfurter.app | Currency exchange rate feeds for FinOps |
api.github.com | GitHub API integrations (Optional) |
| Azure and AWS blob storage endpoints | Accessing cost report storage for FinOps |
External Connectivity Requirements (Installation Time)
During the initial installation process only, the server requires outbound access to download dependencies:
| Domain / Destination | Description |
|---|---|
download.docker.com | Docker Engine package installation |
github.com | yq binary and installation scripts download |
| Cloud provider trust domains | Downloading TLS certificate chains to build JVM truststore |
4. Installation Procedure
Pre-Deployment Checklist
Before you begin:
-
Ensure that the SSH user on VM2 and VM3 belongs to the
sudogroup (the installer will automatically configure this to be passwordless during setup). -
Ensure SSH password authentication is enabled on VM2 and VM3 to allow automatic public key distribution.
Run the following commands on VM2 and VM3 to temporarily enable it:
echo "PasswordAuthentication yes" | sudo tee /etc/ssh/sshd_config.d/00-mcm-temp-auth.conf
sudo systemctl restart ssh
Procedure: Verify Network & Key Settings
- Network Connectivity: Check that VM1 can connect to VM2 and VM3. Verify the required ports (such as SSH Port 22) are open on your cloud VPC security group or firewall. Also verify that no other service is currently running on the required cluster ports (such as ports 2377, 7946, 4789); if a conflicting service is running on those ports, terminate/kill it before starting the platform.
- Binary Package Preparation: Make sure that the tar file is downloaded and extracted to run the deployment (follow Step 1 for this).
- Hardware Requirements Verification: Make sure that before deployment you have a minimum of 10 GB storage and 3 GB RAM available. (On a standard 4 GB VM, approximately ~3.8 GB is typically usable after BIOS/hypervisor reservations; the 3 GB free RAM threshold is designed to account for baseline OS and Docker daemon overhead, so a 4 GB VM is fully sufficient). You can verify these on your host by running the
df -handfree -hcommands. - Automated Connection & Resource Testing: The installer script
install.shautomatically performs pre-checks for system hardware (minimum RAM and disk space), OS version verification, and bidirectional network port connectivity. If any misconfiguration is detected (such as blocked ports, insufficient resources, or incorrect IP), the script will report the exact failing check and exit. You must fix the configuration issue and rerun the installer.
Download & Execute the Installer
Before you begin:
- Verify that you have enabled SSH password authentication on VM2 and VM3.
- Ensure all cluster nodes can communicate mutually over the required Container Orchestrator and telemetry ports.
- IP address configuration:
- If your VMs are on the same network, then enter the private IPs of the VMs when prompted.
- Else, if your VMs are on different networks, use public IPs of all three VMs (need to give Public IPs to VM2 and VM3), but using public IPs is strongly discouraged due to security risks and high latency. Instead, configure VPC/VNet Peering, Transit Gateways, VPNs, or DirectConnect/ExpressRoute according to your setup so that all three VMs can communicate securely over their internal private IPs, then enter their private IPs when prompted.
- Ensure VM1 has SSH access to both VM2 and VM3 (with SSH password authentication enabled on them) before executing the script.
Procedure
-
SSH into VM1 (Access Node):
ssh [VM1_USER]@<VM1_PUBLIC_IP>
# or (using a private key)
ssh -i /path/to/key.pem [VM1_USER]@<VM1_PUBLIC_IP>
Custom SSH Port (Optional)
If your server uses a custom SSH port (e.g.,
2222) instead of the default port22, you can update the SSH configuration and connect as follows:- Update the SSH configuration to listen on your custom port:
sudo sed -i 's/#Port 22/Port 2222/' /etc/ssh/sshd_config - Restart the SSH service to apply the change:
sudo systemctl restart ssh - Connect from your local terminal using the custom port:
ssh -p 2222 [VM1_USER]@<VM1_PUBLIC_IP>
IMPORTANT: Remember to update your cloud VPC security groups, network firewalls, and host firewalls to keep this custom SSH port open inbound instead of the default port 22.
- Update the SSH configuration to listen on your custom port:
-
Download the MCM platform deployment archive: (Contact the Revdau team for download credentials at mcm@revdau.ai for access)
You will receive a deployment credentials email from the Revdau team containing your Registry Credentials (Username and Password/Token):
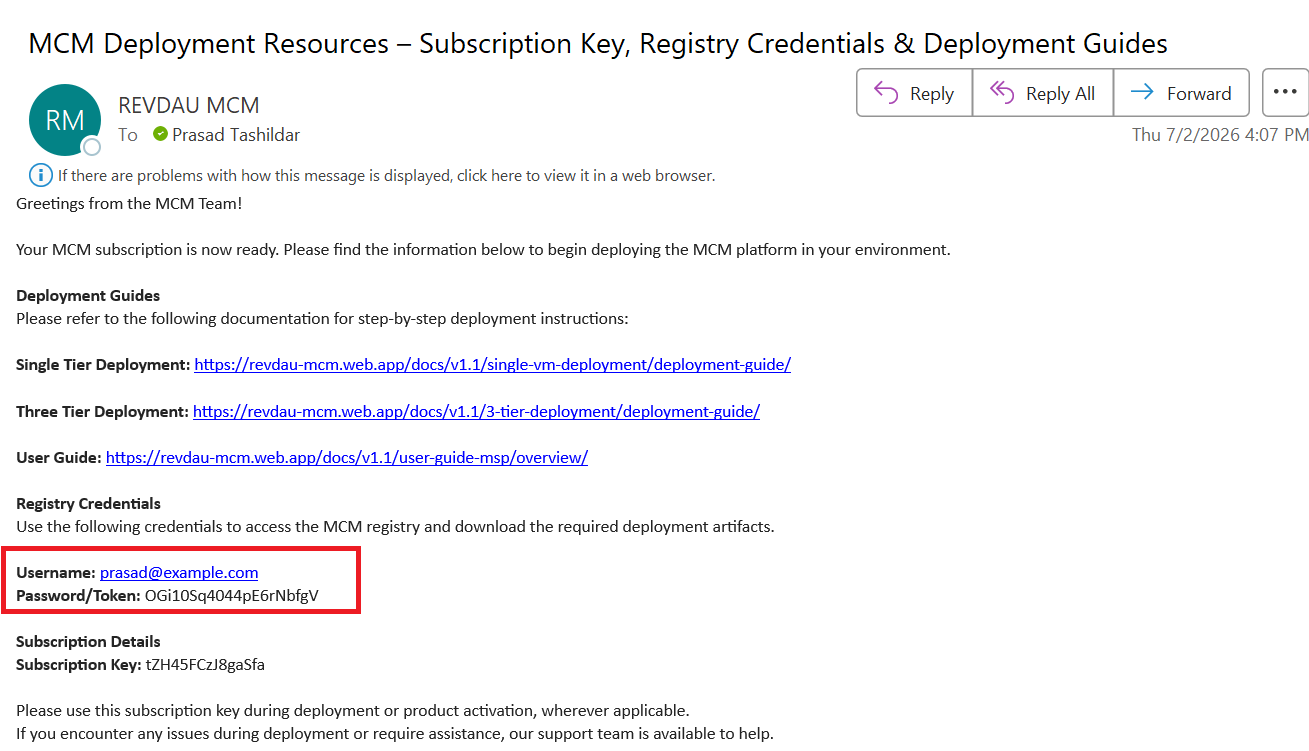
# Define credentials at the top REGISTRY_USER="your_username" REGISTRY_PASS="your_password" # Download the archive from the registry repository wget --user="$REGISTRY_USER" --password="$REGISTRY_PASS" -O mcm_artifacts_1.1.0.tar.gz "http://92.204.249.45:8080/repository/mcm-artifacts/1.1.0/mcm_artifacts_1.1.0.tar.gz" -
Extract the downloaded archive:
tar -xzvf mcm_artifacts_1.1.0.tar.gz -
Navigate into the installation directory, and run the installer script:
cd mcm_artifacts sudo chmod +x install.sh sudo bash install.sh --three-tier -
Respond to the interactive prompts to configure network authentication:
- Enter VM1 IP (Access Node): Type the IP address of VM1.
- Enter VM2 IP (App Node): Type the IP address of VM2.
- Enter VM2 SSH Username: Type the SSH username for VM2.
- Enter VM2 SSH Port: Type the SSH port number for VM2.
- Enter one-time password for VM2: Type the user password for VM2.
(Repeat this configuration when prompted for VM3.)
-
Results: The script executes the network prechecks and prints the verification status for each service path:
==========================================================
          MCM UNIFIED 3-TIER SWARM DEPLOYMENT
==========================================================
==========================================================
          VERIFYING CLUSTER VM CONNECTIONS
==========================================================
Enter VM1 IP (Access Node): 10.0.1.2
VM1 IP: 10.0.1.2

----------------------------------------------------------
Configure Authentication & SSH for VM2 (App Node)
----------------------------------------------------------
Enter VM2 IP (App Node): 10.0.2.4
Enter VM2 SSH Username: ubuntu
Enter VM2 SSH Port: 22
Enter one-time password for VM2: [Type VM2 password]
Copying VM1's public key to VM2 (10.0.2.4)...
Configuring passwordless sudo on VM2 (10.0.2.4)...
✅ SSH Key & Passwordless Sudo successfully configured for VM2!
(The script will repeat this exact flow for VM3).
Once connection setup is complete, it will verify network connectivity on all ports:
Running network path connectivity verification...
Verifying connection from Access Node to App Node ports:
  - SSH service connection (Port 22/TCP): ✅ OK
  - Gossip synchronization service (Port 7946/TCP): ✅ OK
  - Gossip synchronization service (Port 7946/UDP): ✅ OK
  - Cluster Overlay network (Port 4789/UDP): ✅ OK
...
Network connectivity prechecks successfully passed!
After verification passes, the installer script will automatically perform the following actions:
- Initialize Orchestration Engine on VM1 and join VM2/VM3 as workers.
- Apply node labels (
tier=access,tier=app,tier=db). - Configure current SSH users on VM1, VM2, and VM3 as members of the
dockergroup so sudo is not required for running container platform commands in future sessions. - Sync configurations and certificates over SSH tunnels to VM2 and VM3.
- Automatically copy and load the bundled container image tarballs onto their respective nodes.
- Deploy the container orchestrator stack.
Post-Deployment Warm-up: After the installer finishes, please wait at least 5 minutes for the container orchestrator manager to pull metadata, initialize all container volumes, and start the services.
Once the initialization is complete, open the application in your web browser:
| Application | URL |
|---|---|
| MCM UI | https://<DOMAIN_OR_IP>/subscription (Public IP of VM1 Access Node or custom domain) |
Platform Activation & Onboarding
When you access the MCM platform gateway for the first time, you must activate the installation using your subscription details:
1. Retrieve Your Subscription Key
You will receive a deployment resources email from the Revdau team containing your unique Subscription Key:

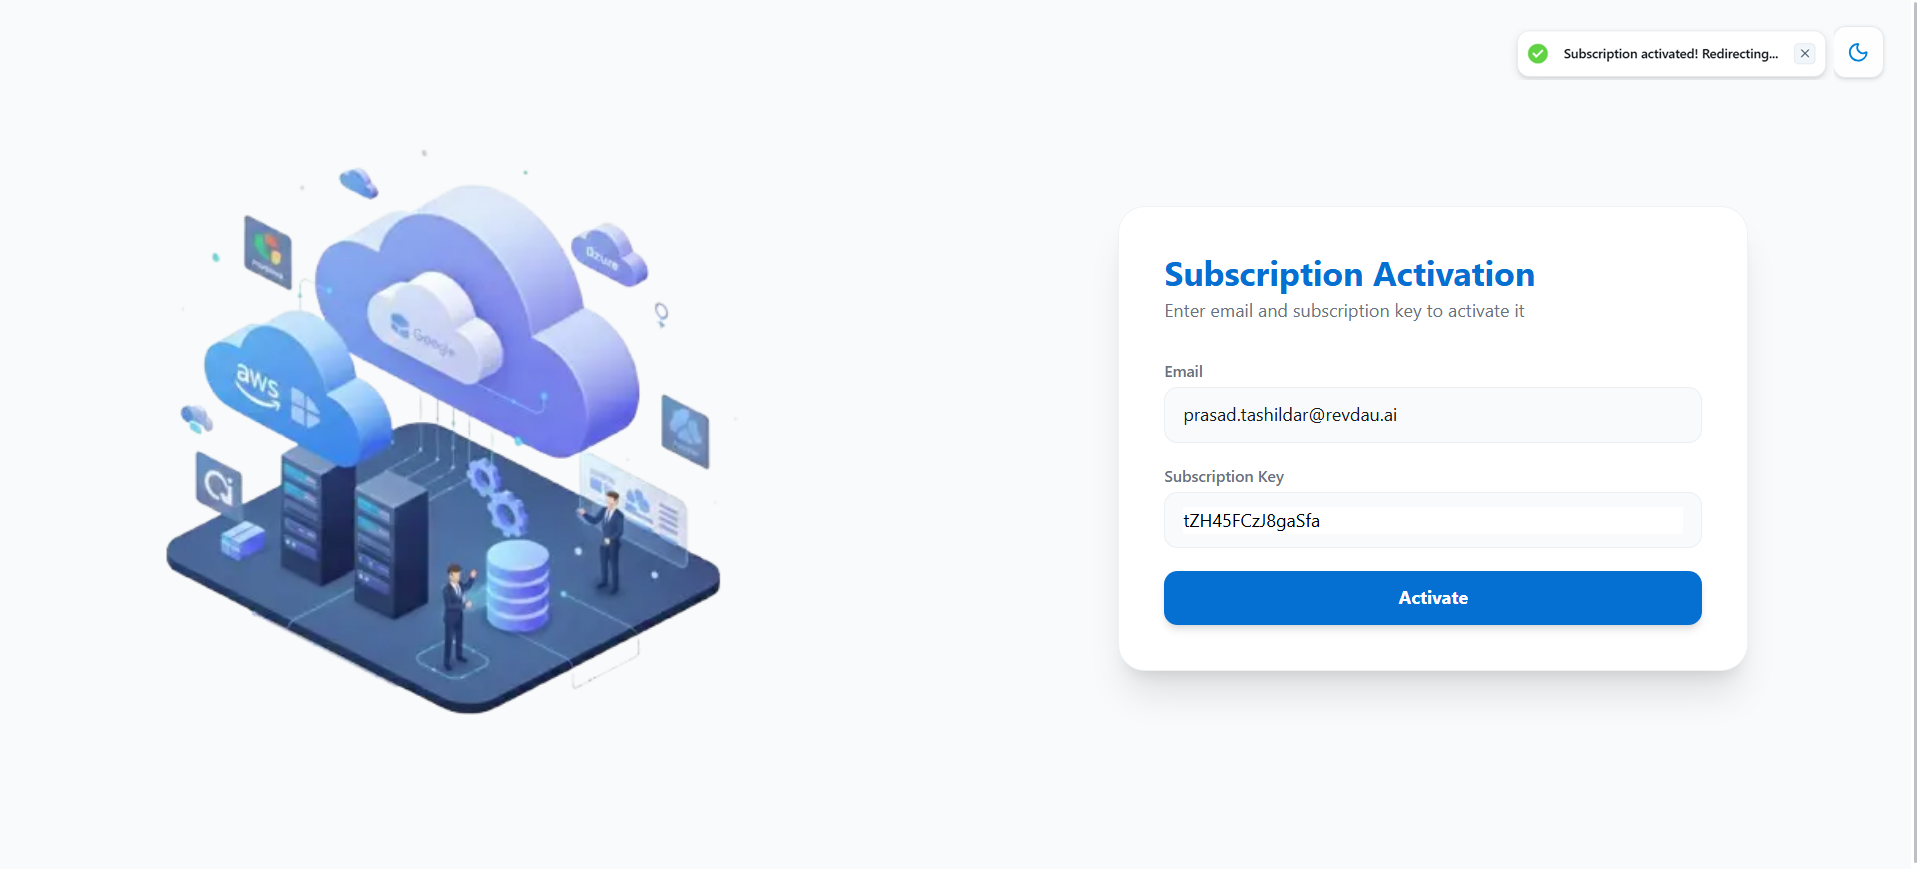
2. Activate the Subscription
Open the application URL (https://<DOMAIN_OR_IP>) in your web browser. You will be greeted by the Subscription Activation page. Enter your Subscription Key and your registered MSP Email ID, then click Activate:
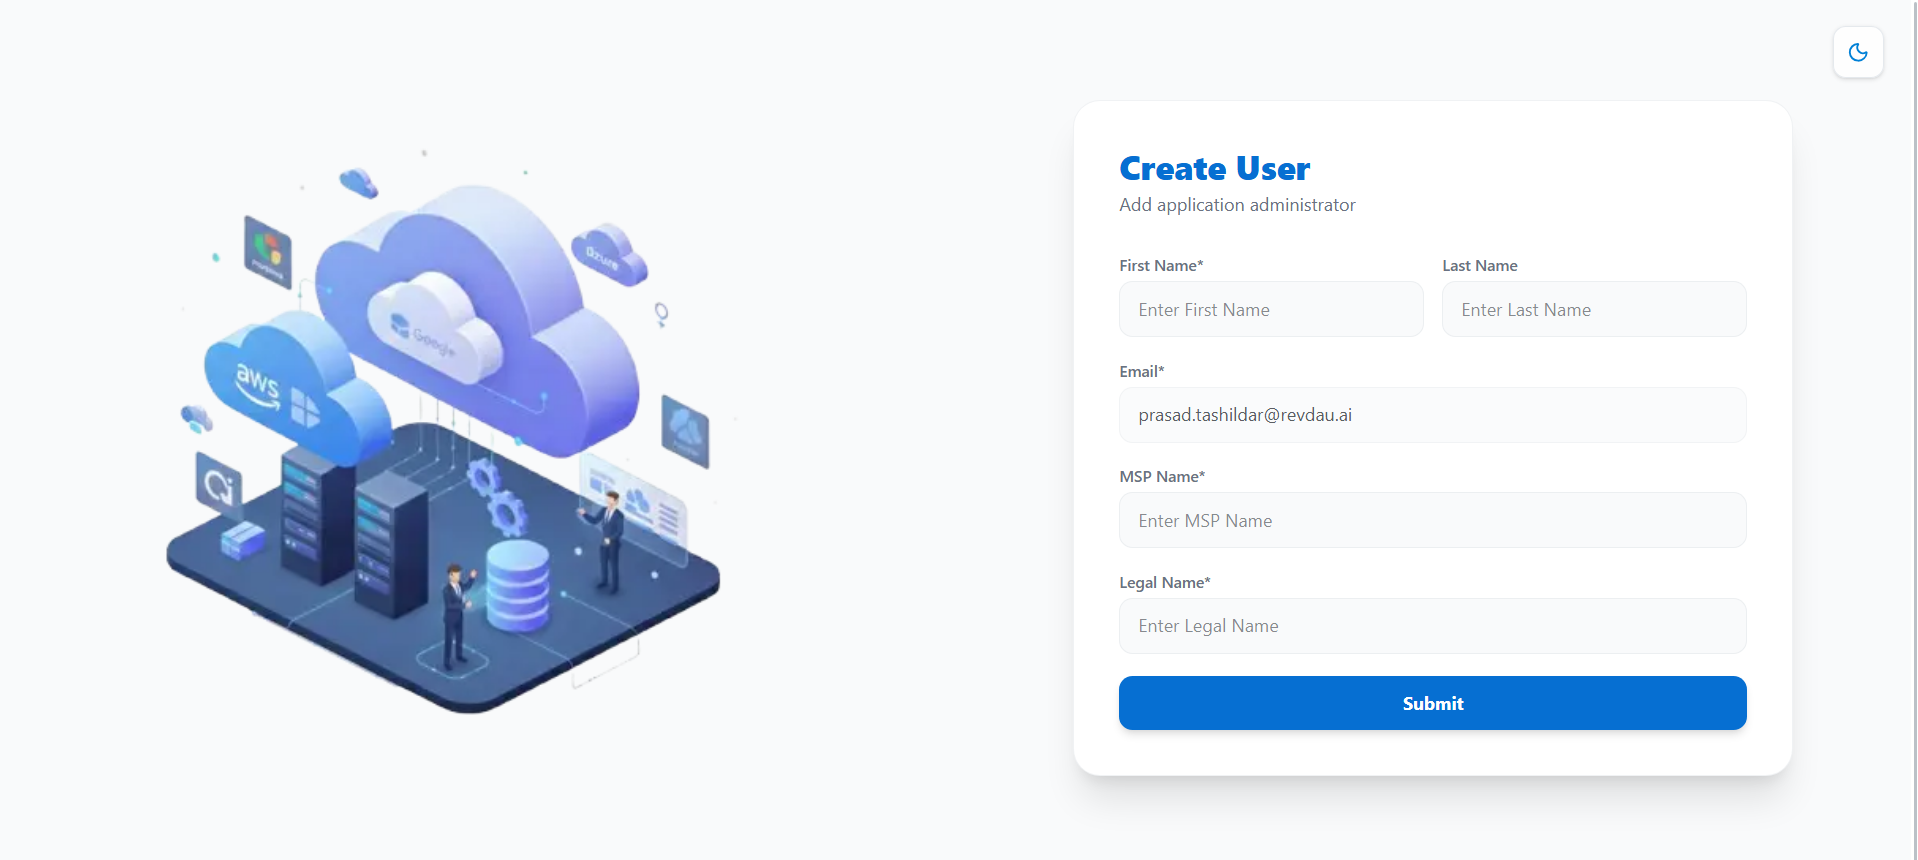
3. Create the Administrator User
Once the subscription is activated, you will be redirected to the Create User page. Enter the details for the primary platform administrator (First Name, Last Name, Email, MSP Name, and Legal Name) and click Submit:
4. Log In to the Platform
After submitting, you will be redirected to the main login portal.
For a walkthrough of the login process, managing credentials, and exploring user dashboards, please refer to the Getting Started User Guide.
5. Post-Deployment Verification & Operations
You can verify the status and health of all deployed services by executing the healthcheck script (Optional) on VM1 (Access Node):
sudo bash /opt/mcm/scripts/healthcheck.shPost-Deployment Security Hardening (Recommended for Production)
Once the installation is successful and passwordless SSH keys have been exchanged, disable SSH password authentication on VM2 (App Node) and VM3 (DB Node) to secure your cluster and meet SOC2/HIPAA compliance standards.
Always toggle via this file — editing sshd_config directly won't work, since cloud-init's drop-in in sshd_config.d/ takes precedence.
Run the following commands on VM2 and VM3 to disable password authentication:
echo "PasswordAuthentication no" | sudo tee /etc/ssh/sshd_config.d/00-mcm-temp-auth.conf
sudo systemctl restart ssh
General Verification and Control
For verification steps, stack teardown commands, and utility control scripts (starting, stopping, restarting, or upgrading the platform components), please refer to the Helper Scripts and Commands Guide.
For custom domain configuration and SSL/TLS certificate management, please refer to the Domain and TLS Certificate Configuration Guide.
For troubleshooting configuration, certificate, or service initialization errors, refer to the Troubleshooting Guide.