
Single VM Deployment Guide
Deployment guide for the MCM Platform on a Single VM — commands, requirements, and configurations.
MCM Platform — Single VM Deployment Guide
Get MCM up and running in under 30 minutes. This guide provides the essential commands, network requirements, and validation steps for deploying the platform on a Single VM.
1. Prerequisites & VM Specifications
Ensure your target virtual machine meets the following minimum specifications:
| Requirement | Specification |
|---|---|
| OS | Ubuntu Server 24.04 LTS |
| CPU | 8 CPU |
| RAM | 32 GB |
| Disk | 150 GB |
| Network | 1 Gbps |
| Access | Root SSH |
| Inbound Ports | 22 (SSH), 443 (HTTPS) |
Scaling for Production
The above specifications are the minimum requirements to deploy and run the MCM Platform. For production environments with larger workloads, refer to the VM Sizing Guide for recommended specifications based on your managed resource count.
2. Network & Connectivity Requirements
Deploying the MCM platform on a Single VM requires provisioning the underlying hosting server. The instance should be configured with the operating system and resources specified in Prerequisites & VM Specifications (Ubuntu 24.04 LTS, 8 CPU, 32 GB RAM, 150 GB Disk).
Infrastructure Setup: On-Premises
Provision a single physical host or local virtual machine meeting the resource specifications:
- OS: Clean installation of Ubuntu Server 24.04 LTS.
- Networking: Assign a static internal LAN IP (and map a public IP or configure a reverse proxy/VPN gateway if external access is required).
Infrastructure Setup: AWS Cloud
Launch a single EC2 instance inside your VPC public subnet:
- AMI: Ubuntu Server 24.04 LTS.
- Instance Type:
t3.2xlarge(8 vCPUs, 32 GB RAM) to meet the resource specifications. - Elastic IP: Allocate and associate an Elastic IP (EIP) to the instance to ensure the public IP address remains static.
Infrastructure Setup: Azure Cloud
Launch a single Virtual Machine inside your Virtual Network (VNet) public subnet:
- Image: Ubuntu Server 24.04 LTS.
- Size:
Standard_D8s_v5(8 vCPUs, 32 GB RAM) to meet the resource specifications. - Public IP: Configure a static public IP resource associated with the VM network interface.
3. Firewall & Security Rules
To secure the single-node deployment, only administrative SSH and web traffic (HTTP/HTTPS) should be allowed inbound. Since the platform utilizes Docker Swarm internally, all cluster management ports (2377, 7946, 4789) must remain blocked from external inbound access to prevent unauthorized cluster probes.
Security Rule Rationale
- Port 22 (TCP): Used for administrative SSH access to the host.
- Port 80 (TCP): Used for standard HTTP traffic. Port 80 automatically redirects incoming requests to secure HTTPS (port 443) so users do not experience connection errors if they access the site via
http://. - Port 443 (TCP): Used for the primary secure application gateway access.
- Ports 1514 & 1515 (TCP): Used internally by the Wazuh Security Agent for security event monitoring, log collection (port 1514), and agent registration/enrollment (port 1515) with the Wazuh Manager container (Required when the SecOps module is enabled).
Procedure: On-Premises Host-Level Firewall (UFW)
Run the UFW configuration commands on your Single VM:
# 1. Set default policies
sudo ufw default deny incoming
sudo ufw default allow outgoing

# 2. Allow SSH and Web traffic
sudo ufw allow 22/tcp comment "SSH Administrative Access"
sudo ufw allow 80/tcp comment "HTTP Gateway Redirection"
sudo ufw allow 443/tcp comment "HTTPS Ingress Gateway"

# 3. Allow SecOps Wazuh Agent ports (Optional - Required if SecOps module is enabled)
sudo ufw allow 1514/tcp comment "Wazuh Agent Log Collection (SecOps module)"
sudo ufw allow 1515/tcp comment "Wazuh Agent Enrollment (SecOps module)"

# 4. Enable the firewall
sudo ufw enable
AWS Security Group Rules (mcm-sg-single-vm)
Configure the following Security Group rules and associate them with your Single VM:
Inbound Rules:
| Protocol | Port Range | Source | Purpose |
|---|---|---|---|
| TCP | 22 | [Your_Admin_IP] | SSH Administrative Access |
| TCP | 443 | 0.0.0.0/0 | HTTPS Ingress Gateway |
| TCP | 80 | 0.0.0.0/0 | HTTP Gateway Redirection |
| TCP | 1514 | [Your_Subnet_CIDR] | Wazuh Agent Log Collection (Optional - SecOps module) |
| TCP | 1515 | [Your_Subnet_CIDR] | Wazuh Agent Enrollment (Optional - SecOps module) |
Azure Network Security Group (NSG) Rules
Configure the following Inbound security rules for your Single VM network interface:
Inbound Security Rules:
| Priority | Port | Protocol | Source | Destination | Action | Purpose |
|---|---|---|---|---|---|---|
| 100 | 22 | TCP | [Your_Admin_IP] | Any | Allow | SSH Access |
| 110 | 443 | TCP | Any | Any | Allow | HTTPS Ingress Gateway |
| 120 | 80 | TCP | Any | Any | Allow | HTTP Gateway Redirection |
| 130 | 1514 | TCP | [Your_Subnet_CIDR] | Any | Allow | Wazuh Agent Log Collection (SecOps module) |
| 140 | 1515 | TCP | [Your_Subnet_CIDR] | Any | Allow | Wazuh Agent Enrollment (SecOps module) |
| 65500 | * | Any | Any | Any | Deny | Block all other traffic |
GCP VPC Firewall Rules
Apply the following firewall rules targeting your single VM instance using network tags:
# 1. Allow SSH access to tagged instances
gcloud compute firewall-rules create mcm-allow-ssh \
    --network=mcm-vpc \
    --allow=tcp:22 \
    --source-ranges=[YOUR_ADMIN_IP] \
    --target-tags=mcm-single-vm

# 2. Allow HTTPS and HTTP access from anywhere
gcloud compute firewall-rules create mcm-allow-web \
    --network=mcm-vpc \
    --allow=tcp:80,tcp:443 \
    --source-ranges=0.0.0.0/0 \
    --target-tags=mcm-single-vm

# 3. Allow SecOps Wazuh Agent ports (Optional - Required if SecOps module is enabled)
gcloud compute firewall-rules create mcm-allow-secops \
    --network=mcm-vpc \
    --allow=tcp:1514,tcp:1515 \
    --source-ranges=[YOUR_SUBNET_CIDR] \
    --target-tags=mcm-single-vm
Outbound Connection Requirements
The MCM platform requires outbound HTTPS (port 443) connectivity to the following main domains:
Firewall Configuration Tip:
When configuring your corporate egress firewall or proxy server rules, use wildcard matching (e.g. *.ubuntu.com, *.docker.com, *.docker.io, *.github.com, *.azure.com, *.windows.net, *.microsoftonline.com, *.amazonaws.com, *.amazon.com, *.aws.com) to ensure all subdomains are automatically allowed.
| # | Destination | Phase | Purpose |
|---|---|---|---|
| 1 | ubuntu.com | Installation | System package updates (apt-get) |
| 2 | docker.com, docker.io | Installation / Runtime | Docker Engine package repository & container images |
| 3 | github.com | Installation / Runtime | yq binary download & GitHub API integration |
| 4 | registry.mcm.revdau.ai | Installation | MCM deployment archive download |
| 5 | digicert.com | Installation | TLS certificate chain validation |
| 6 | azure.com, windows.net, microsoftonline.com | Runtime | Azure Cloud management APIs, Entra ID & cost reports |
| 7 | amazonaws.com, amazon.com, aws.com | Runtime | AWS Cloud management & STS APIs |
| 8 | frankfurter.app | Runtime | Currency exchange rates (FinOps) |
Understanding the Connection Phase:
- Installation: Outbound access required only during initial platform setup/installation to download system packages and binary dependencies.
- Runtime: Outbound access required persistently while the platform is running for cloud API synchronization, inventory management, and cost metric reporting.
4. Installation Procedure
Download & Execute the Installer
-
Connect to the server via SSH (run on your local terminal):
ssh [VM_SSH_USER]@<SERVER_IP> -
Download the platform deployment archive: Log in to the MCM Registry portal at https://registry.mcm.revdau.ai/license using your MCM credentials.
Navigate to the License page to view your MCM App Credentials (Username and Password) and available release versions under Download installation package:
Copy the
wgetdownload command, replace<your MCM App password>with your MCM App password, and execute it on your server to download the platform deployment archive:wget --user="your_email@example.com" --password="your_mcm_app_password" \ "https://registry.mcm.revdau.ai/api/mcm-app/downloads/package?version=1.1.0" -O mcm_artifacts_1.1.0.tar.gz(Note: Swap the version number in the URL to download a different release).
-
Extract the downloaded archive:
tar -xzf mcm_artifacts_1.1.0.tar.gz -
Navigate into the directory and run the installer:
cd mcm_artifacts
sudo chmod +x install.sh
sudo bash install.sh --single-vm
Installation Details:
- Installation Time: Installation takes 15–30 minutes. Outbound internet access is required on the server during installation to install dependencies.
- Docker Permissions: The installer configures a
dockeruser group and adds the current user to it. To execute Docker commands withoutsudopost-installation, runnewgrp dockerin your current terminal session, or log out and log back in.
Once the installer completes, open the application in your web browser:
| Application | URL |
|---|---|
| MCM UI | https://<DOMAIN_OR_IP>/subscription (Server's public IP address or custom domain) |
Platform Activation & Onboarding
When you access the MCM platform gateway for the first time, you must activate the installation using your subscription details:
1. Retrieve Your Subscription Key
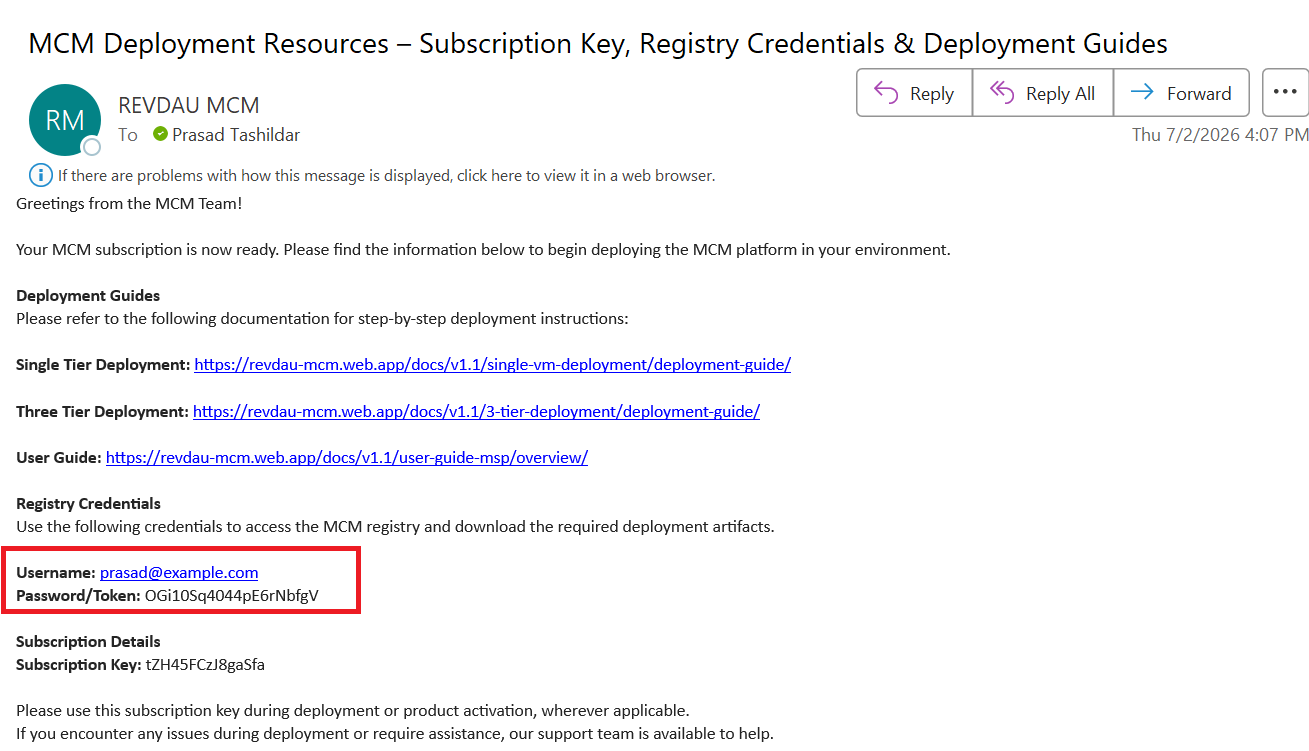
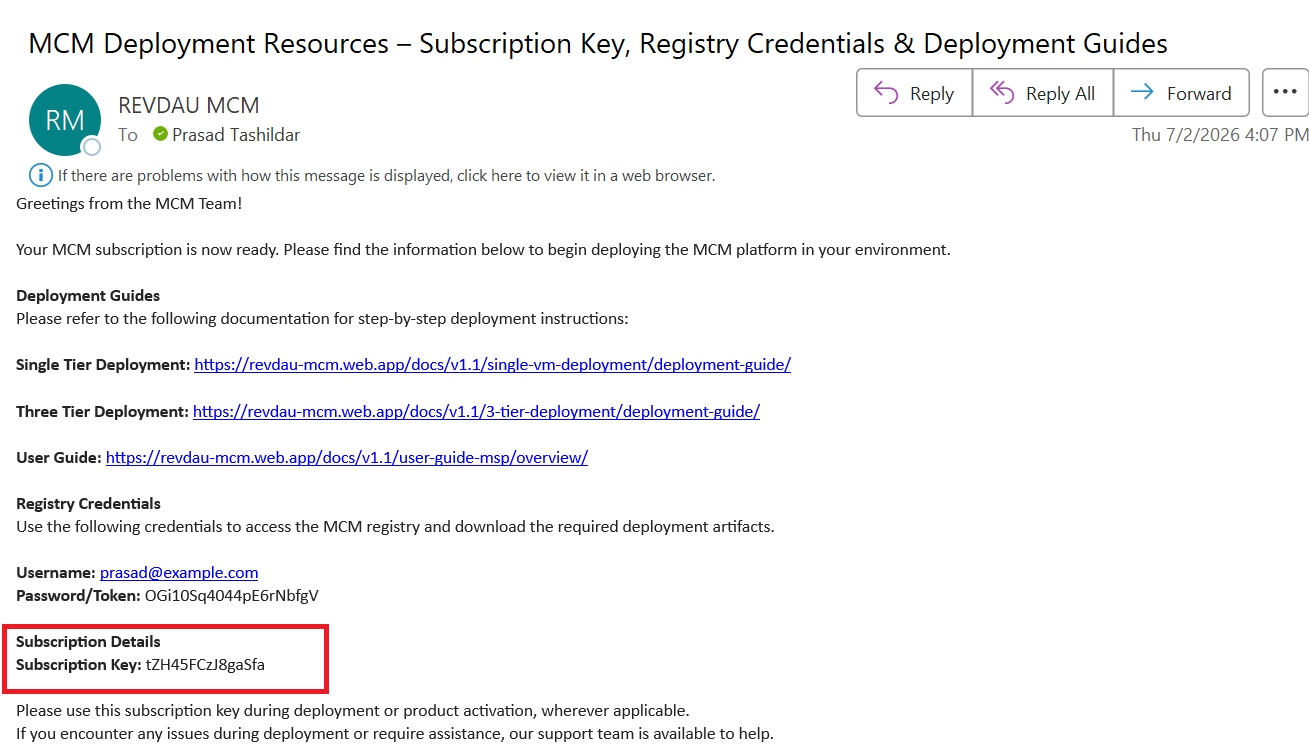
Once your purchase is approved, you will receive a subscription details email from the MCM team containing your Username (Registered Email ID) and Password/Token:
2. Activate the Subscription
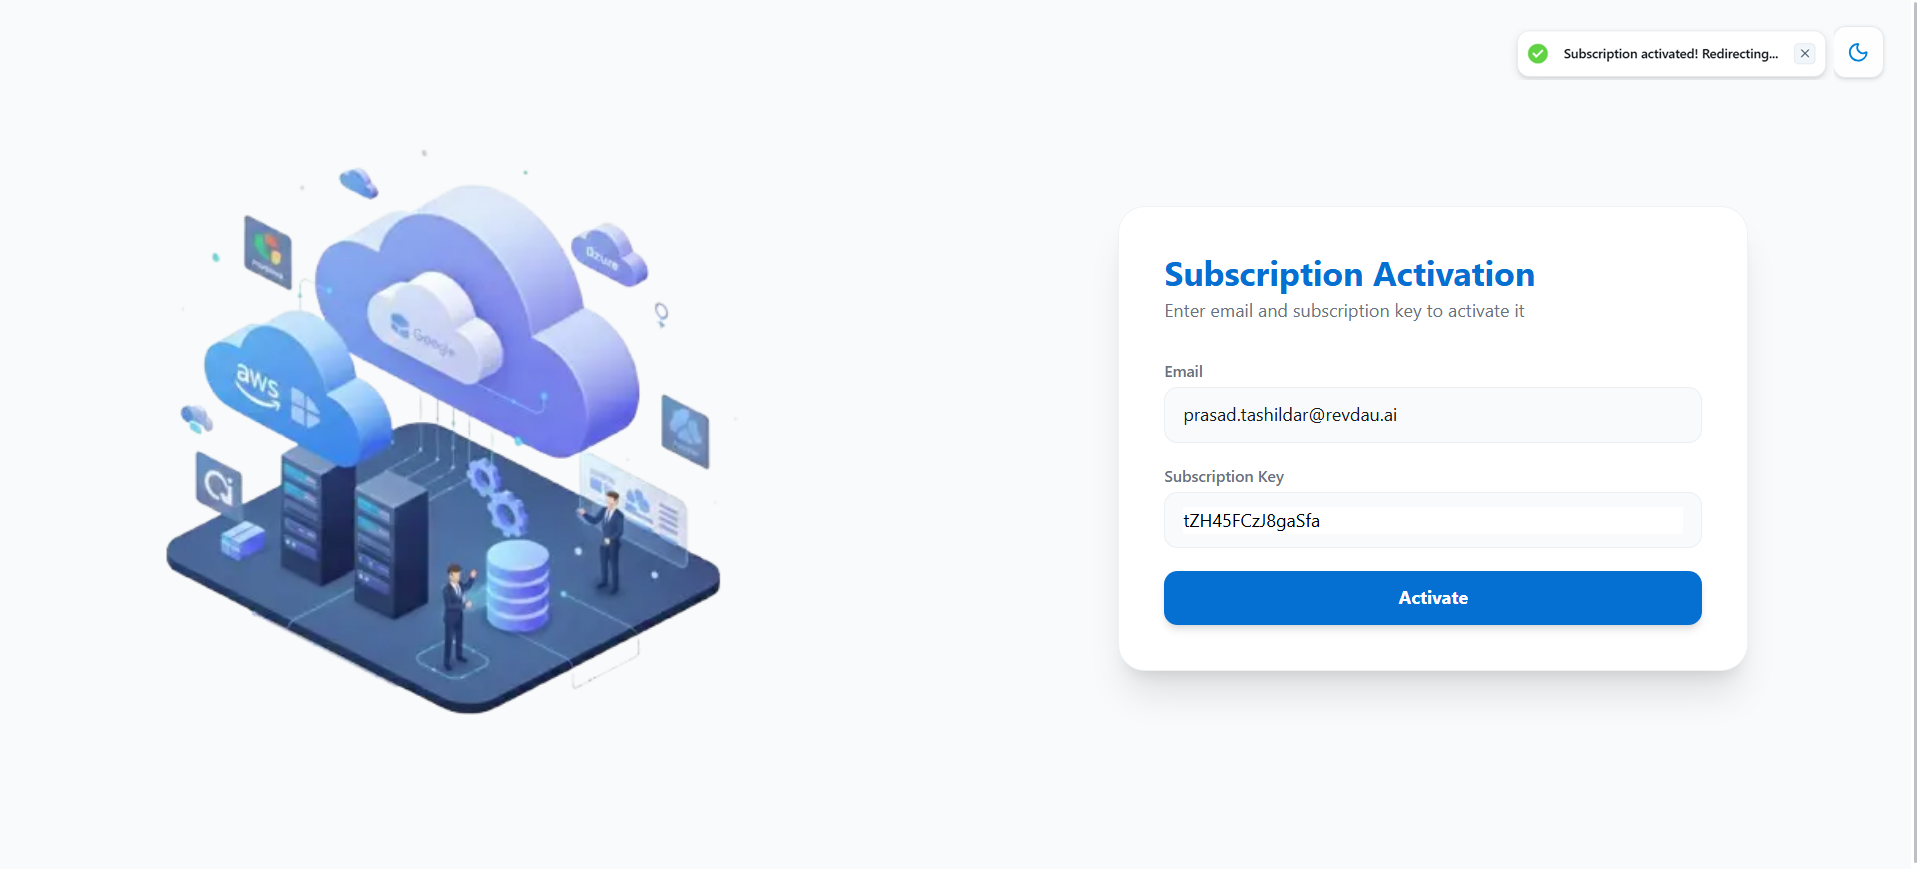
Open the application URL (https://<DOMAIN_OR_IP>) in your web browser. You will be greeted by the Subscription Activation page. Enter the Username (Email ID) and Password/Token received in your email, then click Activate:
3. Create the Administrator User
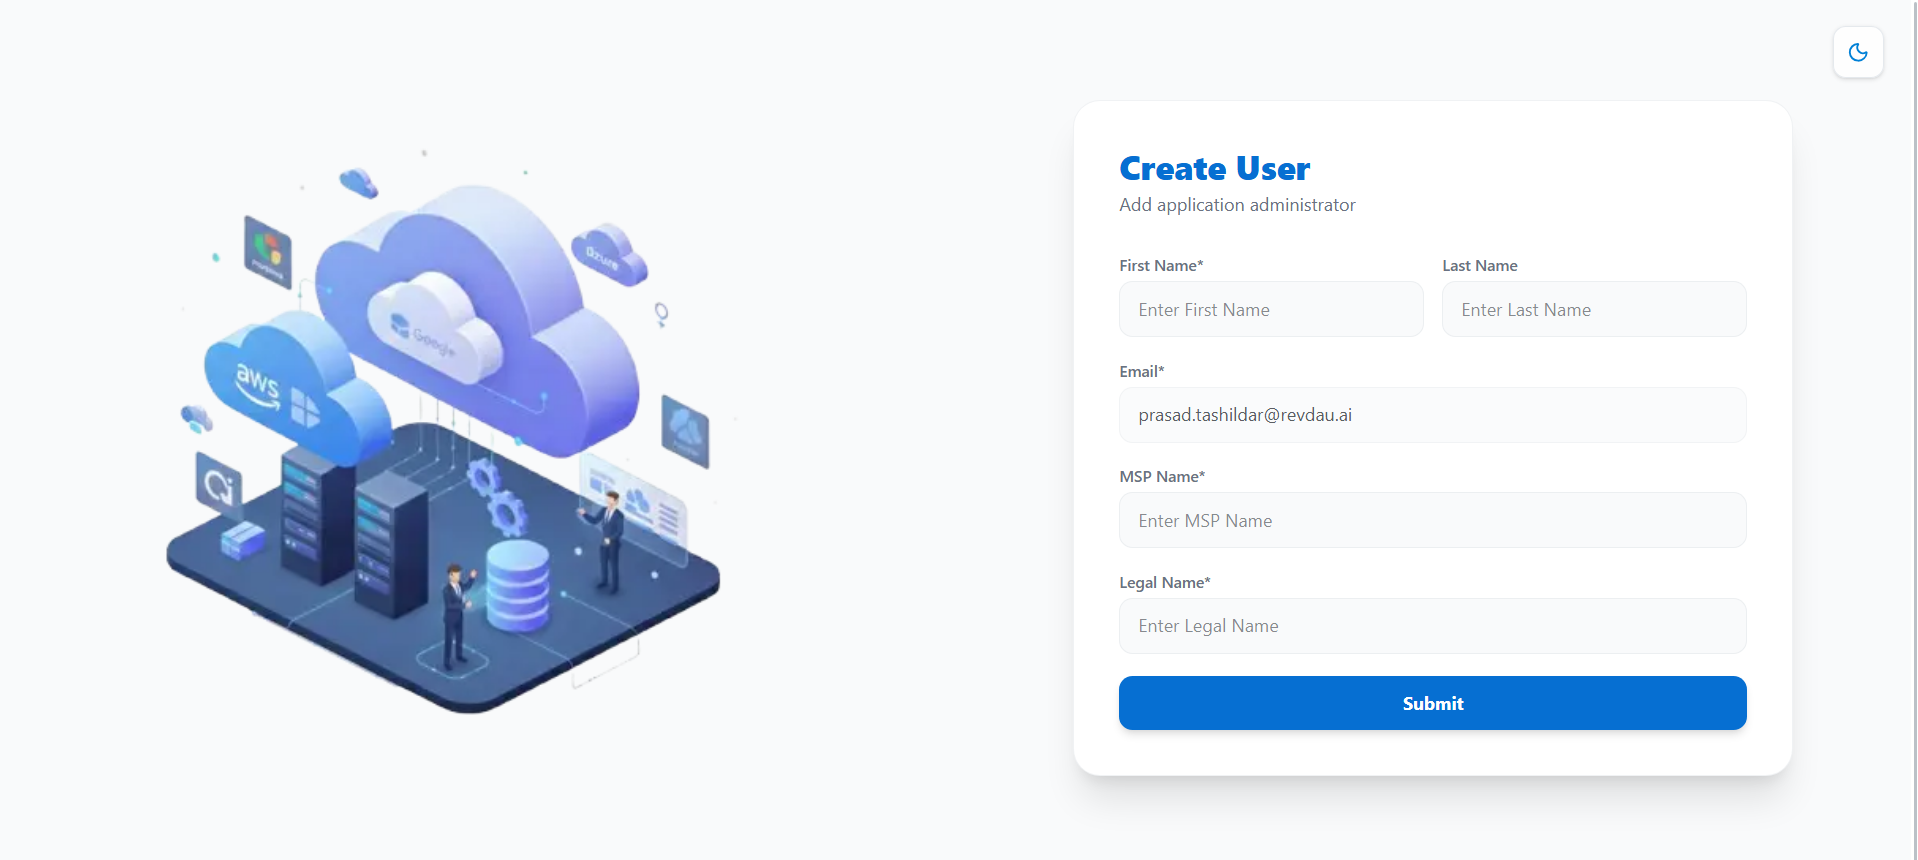
Once the subscription is activated, you will be redirected to the Create User page. Enter the details for the primary platform administrator (First Name, Last Name, Email, MSP Name, and Legal Name) and click Submit:
4. Log In to the Platform
After submitting, you will be redirected to the main login portal.
For a walkthrough of the login process, managing credentials, and exploring user dashboards, please refer to the Getting Started User Guide.
5. Operations & Health Verification
You can verify the status and health of all deployed services by executing the healthcheck script (Optional):
sudo bash /opt/mcm/scripts/healthcheck.shGeneral Verification and Control
For verification steps, stack teardown commands, and utility control scripts (starting, stopping, restarting, or upgrading the platform components), please refer to the Helper Scripts and Commands Guide.
For custom domain configuration and SSL/TLS certificate management, please refer to the Domain and TLS Certificate Configuration Guide.
For troubleshooting configuration, certificate, or service initialization errors, refer to the Troubleshooting Guide.